Friday, January 03, 2014

2001 Jeep Grand cherokee Wiper Arm Replacement

My wife has been complaining about the left windshield wiper that it couldn't clean the glass properly even with brand new rubber wipers. I pretended to keep a blind eye on the problem until she told me it was about safety of your family. So i decided to replace the arm together with the wiper. My reasoning for the replacement is simple: since the right part of the glass has been okay all the time and the motor works properly,  most likely it is because of the wiper arm is loose. As usual the dealership would not have the option to replace the spring in the arm. I have to replace the whole arm assembly myself.

The job seemed very easy:

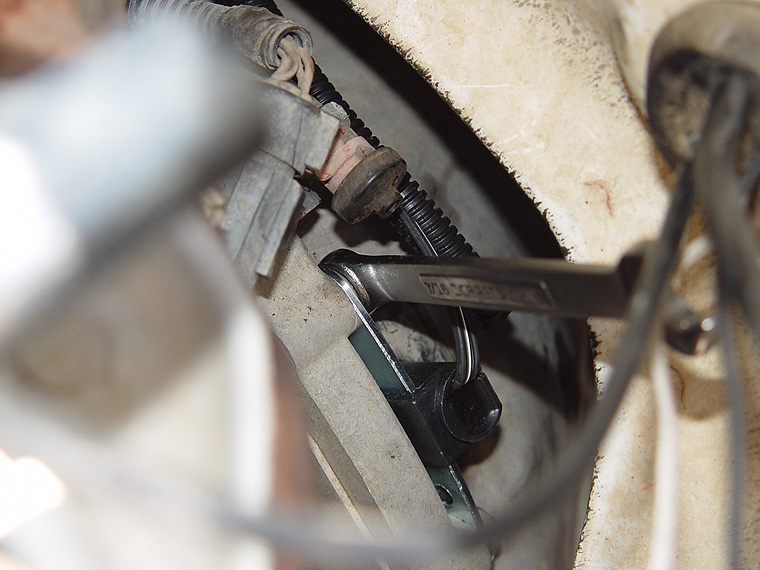
Use a 10mm socket to take off the hex nut locking the wiper arm on the motor. Then release the old wiper arm and reverse the procedure with a new wiper arm costing $35.

The actual procedure was damn irritating -- the rust locked the wiper arm on the motor. It took me a hundred knocks on the old arm until I realized that I need some puller to do the job.

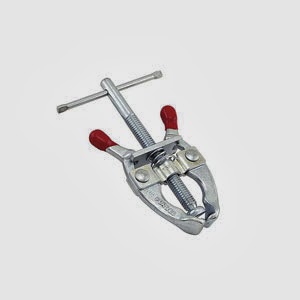
Firstly, i thought of battery terminal lifter, which is available at Autozone or O'Reilly with price around $7.
This piece is so crappy for my purpose: it was bent during the first try to pull the wiper arm. It is made of aluminum materials which cannot endure much brutal force.

Then I have to buy some stuff more serious: I went to Sears and found the Craftsman 2-3 jaw gear puller. Luckily it was on sale for $30.
Problem fixed in one minute after applying this puller.

Labels: ,

Thursday, January 02, 2014

2001 Jeep Grand Cherokee rear differential fluid change

The real differential fluid wasn't completely changed ever since I bought the Jeep in 2007 -- I knew it would be a messy job if I take down the differential cover and refill the pumpkin after cleaning. In 2010 or so I used a pump to suck the fluid and to refill the pumpkin a few times without taking down the cover.

Last year I was informed by an engineer at a Jeep dealership that the rear differential was making a sound when the car started to move. They would charge me about $300 for overhauling it. I decided to change the fluid myself.

Tools and materials i used:

0. 75W-140 gear oil; two bottles (2 qts)


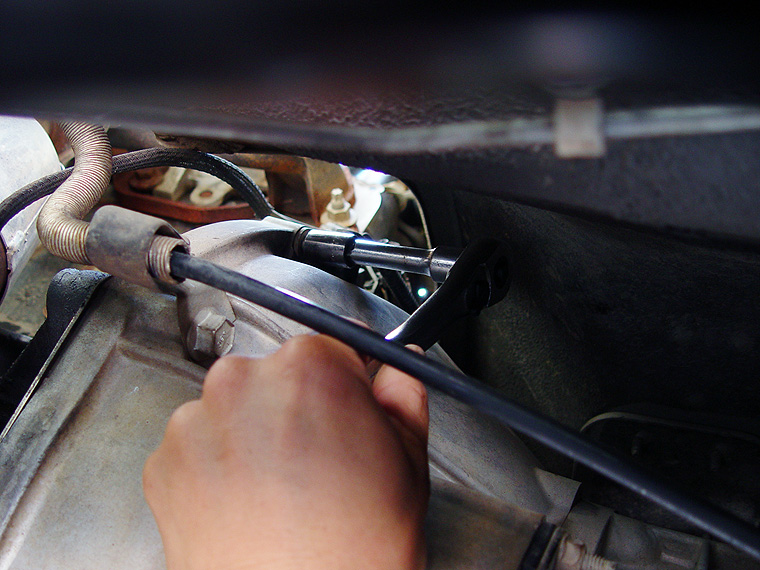
1. 3/8'' flexhead rachet; (the room above the pumpkin is very tight, big sockets would be inconvenient to apply)


2. Permatex® High-Temp Red RTV Silicone Gasket;


3. Gasket Scrapper


Steps:

1. Put an oil pan below the differential and go underneath the car to take down the differential cover -- no need to raise the Jeep otherwise is dangerous working under a car and it would not help with more room for taking down the cover; 

2. After unbolting all the bolts, the cover did not come down automatically since old RTV sealant was still adhesive. Take a hammer to knock the cover horizontally to the joint surface. 

3. When the cover comes off, old fluid will drain down into the oil pan. It smells weird, though.

4. Clean the housing cover with brake cleaner or WD-40. 


5. Use the scrapper to remove the old sealant on the edge of the cover.

6. Remove the rubber refilling insert on the cover. It was damn tight because it lost plasticity after sitting there for so many years.

7. Clean the differential house and the use the scrapper to remove old sealant on the edge of the housing.

8. Apply the RTV on the edge of the differential cover.

9. Install the cover back; do not over tighten  (Torque: 25 lbs.ft). I don't think it is realistic to use torque wrench tighten the bolts in such a small room. Just evenly tighten each of the bolts until you cannot rotate the wrench by hand.

10. Since the room is very small behind the gas tank, I use turkey flavor injector to refill. It took a million years to refill with two bottles of the gear oil. So far I did not figure out a better approach, keeping in mind that the room is small and the usual pumps will make a big mess using vinyl tubes.

11. When the service port starts to overflow fluid. Stop refilling and put the rubber insert back to the service port. Use a long-handle chisel to push it in if necessary. 

12. That is it.


Labels: , ,

Tuesday, April 09, 2013

Jeep Grand Cherokee rear running lights (tail lights)/brake lights not working

I was once told by a senior couple at a shopping center that one of my brake lights was out. I replaced the bulb and was out once again soon. I was also told that the problem was that the heat melt some part of the plastic assembly and caused circuit short or loss of contacts between electrodes -- I replaced the assembly without a cure.  Since I saw many many Jeeps have the same blind eyes on the road, I then have been ignoring this problem (for three years) so that I could save my time and effort.

Last Saturday my wife gave me a ride from a party (lots of wines!!), it was almost home when a policeman flashed his fabulous lights. I told my wife not to panic since it must be the broken brake and tail lights -- the only thing is that  there is no way to keep a blind eye to the problem any more.

After a careful test, I found that one brake bulb was out. But the right tail light did not work any way. Checked the fuses, no luck. Assembly is a newer one.  What else??

The bulb SOCKET is the last suspicious culprit which I can imagine. The good thing is that the sockets are not expensive -- USD 7.95 from the online parts department of a local dealership -- not expensive anyway. I ordered six for about $60.

The parts arrived in one day. It is a piece of cake to take down the socket with a screw driver. The only thing is that one needs to turn the socket counterclockwise til it cannot move under finger force. Then use a flat screw driver to pry it out. -- install it later in a reverse way. The following is the picture of an old socket with burnt butt.


Put the new ones on. A long time headache is gone.

Labels:

Sunday, August 01, 2010

A short note on the travel from London to Dallas

I had been preparing for the trip for a long time. The most concern was that my 9 years old Jeep was subject to tons of maintenance and repairs. The expensive labor and parts for Jeep forced me to service it by myself. As such, I flushed the coolant reservoir and radiator, transfer case, front/rear pumpkin and 
transmission, and replaced the governor pressure sensor and solenoid in the transmission, and the brake pads and rotors.

After the maintenance and repairs, I drove 2 days and covered 2100 km from London to Dallas.  The following are my experiences that need to be recorded for future reference.

1. Plan the trip well and have both paper map and GPS handy.  I forgot my North America atlas home and the GPS gave me much trouble: The Garmin GPS was very shy to approach the country border and led me to some unexpected roads. Also,  the Garmin GPS is misleading and annoying when there are some temporary construction sites in the highway.  It would keep demanding the driver to a closed highway entrance.

2. Keep a correct tire pressure. Most tire explosions are caused by incorrect (low) tire pressure.  Too much tire pressure will make car bumping on the highway which is also dangerous.

3. Keep off trucks and be careful when passing trucks.  Trucks have much larger blind area than cars. Do not drive parallel to a truck for a long time because the truck would change lane without finding a car in its blind area.

4. Refill the gas tank in a timely manner and keep energetic. There are many gas stations and motels along highways.  So we don't have to worry about where to go. However, there is a smart way to save money. If we need to have a rest and meal, try to find a Walmart supercenter in a small town close to the Highways. We can find almost everything in Walmart including a quiet and clean restroom. I had meal and stayed for two hours at Anna Township in Illinois before I continued my trip. It is really a unforgettable memory in my life.

5. If we have to customize a route in GPS, do not set a via point off the highway. This is because we would change the stopover points from time to time. If you set a via point off the highway and don't stick with it, the GPS would be mad at you. At this time, we have to turn off the GPS and shut it up. Well, these actions are dangerous during high-speed driving.

Even though I had some trouble at Lansing, Michigan, where the entrance to I-69 S was closed and I almost drove around the city for two cycles before I found an entrance,  this long travel was a success and will be a pleasant experience in my life.  Let us keep down the cities and townships I travelled:

First day, 800KMs: London, Ontario --> HWY 402--> Sarnia--> HWY I-69 --> Grand ledge (near Lansing) -->HWY I-69 --> Indianapolis-->HWY I-70 --> Cloverdale, Indiana

Second day, 1100 KMs : -->HWY I-70 -->Effinham (Illinois) --> HWY I-57 -> Anna (Illinois)--> HWY I-55-->West Memphis (Arkansas)-->HWY I-40 --> Little Rock (Arkansas) --> HWY I-30 --> Texarkana (Texas) --> New Boston (Texas)

Third day, 260kms: -->HWY I-30--> Dallas.

Labels:

Wednesday, July 21, 2010

Change front and rear gear oil and transfer case fluid of Jeep GC 2001

This is actually a big lesson for me:

I used a fluid transfer pump to  drain and refill the front and rear pumpkin. There was no trouble.

But replacing the ATF+4 in the transfer case which was the easiest job in my memory turned out to be a headache for me: I damaged the magnetic drain plug: I thought I could use the 3/8" hex socket to take it down which was what I did. But this time, I could not do that any more since the right socket is the 10mm or 7/16" hex socket. The washer head of the drain plug was turned by a smaller hex bit to be rounded.


Asked around and found some possible solutions to extract the rounded-off plug:


1. Use a cold-chisel and hammer it into the female drain plug and make a notch in it. Then use visegrips to turn the chisel and take out the damaged drain plug;


2. Welder a regular square male bolt into the female plug. Use wrenches to unbolts it;


3. Use a special tool called Pipe Nipple Extractors. They are available at Princess Auto in Canada and Harbor Freight Tools in the US.


Too bad my Jeep is sleeping at the parking lot and I have to buy tools taking Bus.


Update: I had to spend 30 bucks to ask a garage to weld a regular male bolt into the female plug. I replaced the damaged bolts.

Labels:

Monday, July 12, 2010

A possible reason for Tranny slipping

I once came to the symptom that my Jeep couldn't move when I hit the gas.  I replaced the governor pressure sensor and solenoid because I had sluggish tranny shifts and P1756 code. After the governor pressure sensor/solenoid replacement, the tranny runs like new.  So I only need to keep an eye on it.

If tranny slipping will repeat, I might need to replace the  TPS (throttle position sensor). The procedure to diagnose a TPS is explained at the website ehow.com. The following is the diagram for TPS removal and installation.


Labels:

Sunday, July 11, 2010

Jeep GC creeps in neutral

My Jeep GC 2001 creeps in neutral. However, it won't accelerate when hitting the gas pedal, which means that the clutch is indeed disengaged. This seems not normal but some guys found this phenomenon and explained that the tranny gears would still rotate by the fluid turbulence which is propelled by the engine output shaft.

Moreover, it is quite interesting that one Jeep guy was very much proud of the ability of Jeep GC that it could "idle in neutral and crawl up an incline at 10,000 feet in the mountains", which is exactly the phenomenon I am worried about!

Labels:

Thursday, July 08, 2010

Flush the cooling system of Jeep Grand Cherokee 2001

There are three parts for cooling system of a typical vehicle: radiator, reservoir and engine block. There is a plastic drain plug underneath the radiator which can drain the coolant in the radiator and reservoir.

However, it is not an easy job to drain the coolant in the engine block of Jeep grand Cherokee 2001, since the drain plug located under the intake manifold is a female pipe plug. We need a 5/16" male pipe plug socket to take  it  down. Despite the possibility that the plug would be rusted and get stuck in the engine block, the 5/16" pipe plug socket is very rare in the Canadian market. I searched around the city of London in Canadian Tire, Part Source, Rona, NAPA, Home Depot and Federated Tools, without any luck.


The original coolant in my Jeep is the conventional ethylene glycol based green coolant. I cannot change it to the more advanced orange long life HOAT coolant because mixing green coolant with the orange type would produce some sediments in the cooling system which are highly harmful to the components of the cooling. system.

An informative article by James B. Wills, Jr.  reads
An alternative to tradition green antifreeze is a product currently used by many engine manufacturers. "Orange" antifreeze is a long life or extended life type of antifreeze used to increase the useful life of engine coolant. It is ethylene glycol base as is the green antifreeze. The difference between the two colors is that orange antifreeze contains a different type of corrosion inhibitor that has a much longer service life than silicates, phosphates and borates. Orange antifreeze contains organic acids that protect engine parts from corrosion. Silicate (green) type antifreeze does not mix with orange type antifreeze. Never mix the two colors in a cooling system. The organic acids in orange types will cause precipitation of silicates in the green type and corrosion protection is greatly reduced.
Now that it was difficult to drain the green coolant  in the engine block, I had to stick with the green coolant and just replace the old coolant in the radiator several times. The following is what I did today:

1. Bought two jugs of concentrated regular coolant from Jeep dealership. 2X 3.78 Liter, 17.7 CAD per jug;

2. Bought two jugs of distilled and ozonated water. 2 X 4 Liter. 1.67 CAD per jug. Open the lids and dispose them in sunshine for two hours letting the ozone out;

3. Use a 2 feet gardening hose as an extension to the original drainage hose at  the drain plug and put one end of the extension hose into a bucket with measure scale;

4. Open the drain plug located at the left corner of the radiator facing the rear of the vehicle (NOTE: The service manual said it was at the right corner of the radiator!); That is, it is to the passenger' side. Then twist the valve counter clock-wisely 270 degree.

5.  The total amount of the old coolant drained from the radiator and the reservoir is 7.5 liters, which is 60% of the coolant in the cooling system (12.3 liters).

6. Put a half jug of the concentrated coolant into the radiator and then a half jug of the distilled water;

7. Mix the remaining half jugs of water and concentrated coolant together. Pour the mixed coolant into the radiator and the reservoir jug.

8. Let the car run for at least 10 minutes and bring the system into working temperature. Repeat 1--7 after the system cools down.

The following are simple arithmetics: After the first round (step 1 -- 7),   60% old coolant was replaced; After the second round, 84% was replaced; 

Labels:

Monday, July 05, 2010

Replacing Brake Rotors and Pads of Jeep Grand Cherokee 2001

Due to the twin-piston design of the front calipers of 1999-2002 Jeep Grand Cherokee, the pads are easy to contact the rotors unevenly and the uneven wear can cause  excessive rotor warp-age. The brand name of the caliper for 1999 - May 10, 2002 Jeep WJ is Teves (black color with open-sided bracket). For WJ after May 11, 2002, the caliper has been replaced by another type with brand name Akebono (silver color "fully closed" style).

My Jeep unfortunately falls into the time interval  1999 - May 10, 2002 and has  Teves calipers.  Recently I felt much pulsation when I hit the brake, which means that replacing the brake pads and rotors becomes necessary. One could choose to replace the calipers as well. But for me, it will cost too much for a 9 years old car. So I would like just replace the pads and rotors and hope I could use three more years.

I am not going to detail the steps on how to replace the rotors and pads since no special techniques are required for Jeep. All the steps are standard. However, I would like to record the tools and toque specifications in the following because it took me much time to find the correct tools to finish the service as the service manual did not give such specifications:

Tools and toque specifications
1. To remove the caliper mounting bolts, we need a Torx T45 bit;

2. To remove the bolts of the C bracket, we need a 18mm socket;

3. To service the brakes by oneself, it is highly necessary to have a heavy duty torque wrench which has a long handle; It will be very helpful to remove the 18 mm bolts of the C bracket;

4. Use 13mm socket to remove the lug nuts.

5. The torque of the mounting bolts is 15 N . M  (about 133 in lbs) 
    The torque of the bolts of the C Bracket is 17.5 N. M. (155 inch lbs)
    The recommended torque for lug nut is 115 ft lbs.

The following are some tips I learned in the project: 


a. The brake disc would get stuck with the wheel hub. One normally needs to hammer it off. To save some effort to hammer the disc, we could spray some WD-40. If this still can not work, we can use the C-clamp in this way: put a wrench with a hole in the handle on  one of the lug nut bolts, lock it with a lug nut, the wrench will cover the  center of the wheel hub. Then set one foot of the C-clamp on the wrench head (cover the wrench head with some wooden materials), the other foot on the brake disc. Rotating the handle of the C-clamp will produce some force sending the disc off the hub. If the force from the C-clamp does not take off the disc,  then hammer the back of the disc at the same time. Some-times knocking around would help unlock the rust.

b.  When we install the caliper, the disc might sway off the surface of the wheel hub. This could cause some trouble to put the caliper in place.  One can use the wrench and lug nut once more: overlap two wrenches with holes in one end  and let them sit in the lug bolts, lock them with a lug nut. In this way, the brake disc won't sway anymore.


Labels:

Sunday, June 27, 2010

Intermittently working Air Conditioning of Jeep Grand Cherokee 2001

My Jeep A/C has been working intermittently for a couple of years without a  diagnosis. I could live with it but my wife who gave birth to my new baby girl cannot tolerate it anymore.

The symptoms of my A/C are as following:


When it works, everything is fine. Otherwise, the LED of the A/C switch does not light up and there is no cold air either. Sometimes tuning the ventilation knob could let the A/C work but cannot cure the problem.


I googled a lot but didn't find any write-ups on  Jeep WJ with these symptoms. Many Jeep owners had faulty blower motor/blower motor resistor/blend door actuator. My reasoning on my faulty A/C is very simple: Now that it could work intermittently, the major components such as compressor/condenser/ accumulator and blower motor have very low possibility of malfunction. It might be some bad switches, connectors or other electrical components.

I checked the blower motor resistor which is  easy to access but it turns out to be good. (Actually my A/C doesn't work at HIGH when it cannot work normally, but in this case the blower motor resistor is bypassed by the A/C system. So  it is quite reasonable that the blower motor resistor is not the culprit.)

The next target is the blend door actuator. I am not sure if a bad blend door actuator could result in the failure of the A/C. I took it down from the left side of the glove box before the passenger seat. (The glove box is very easy to be removed. Just use some firm force to spin the bin downward. Don't be afraid. It wont break. :-))


I could spin the small motor of the blend door actuator which sounds no problem. The safest way to check is to use a 12v battery to check if the motor can work.

My third step is to check the Heather and air conditioner control panel.


0. Disconnect the battery. 


a: Gently pry each of the four corners of the center lower/upper bezel away from the instrument  panel. A used dinner knife would serve this purpose well. 

 Upper bezel:
 Lower bezel:
 b. Unscrew the bolts at four corners of the Heather and air conditioner control panel then the panel is down.

c. Hook on the battery and test the fan switch at the left side. The voltages  between the four pins are symmetric ( the approximate readings in my  memory are 12.37 v/ ~0.25 V ). I forgot to take the picture of these pins.  Then  it sounds that the biggest suspect is  the  following vacuum switch at the back of the heather and air conditioner control panel. 


d. To confirm that the vacuum switch is faulty, we start the engine and push connector to see if the A/C or electrical fan is working. Anyways, if any difference of the symptom happens when we let the connector move without taking it apart. Then we are sure that the connector need service. In  my case the connector was somewhat loose, and the A/C began to work when I firmly pushed the vacuum harness toward the panel. This indicates that the vent vacuum switch is the least culprit of the problem.


e. To service the connector, I have some lessons: First, we should be careful that  there are three springs inside the connector and they would bounce away to nowhere if we pry off the three clips carelessly. So let the vacuum harness lift SLOWLY off the metal axle in the knob.  (If one did miss some springs, the spring in some click ball-point pen is a good alternative.)   Second, mark the relative location of the metal axle in the knob (the intersection of the axle is a half circle) and the vacuum harness.


f. Use some cleaner (I use WD-40) to clean the inside of the connector which is a printed circuit. Note there is a plastic round seat for the three springs  with a metal  cover at half way of the metal axle in the turning knob. Normally, it is impossible to restore the relative position of the springs and their cover because they are not held together by anything, unless the first two owners serviced it and missed something.


I employed my 50 lbs fishing line to hold the springs to their plastic seat with the metal cover. The hard fishing line is the best material that I can imagine  and can do this job. (Sorry, forgot to take pictures. It looks quite funny.)


g. I think, if i am not naive, that the connector of the vacuum harness might need some sort of sealing. So I dripped some ATF on the connector. (The fifth picture shows the oily connector).


h. Hook the connector with  the metal axle in the turning knob.  Note there is a metal bead on top of the plastic seat of the springs. Since the connector is loose.  I used fishing lines again to hold the connector firmly.


I. Reverse the steps that we took down the upper/lower bezels and restore the panel. 


J. Test. It works like a charm for me. Thanks for reading. ;-)

Labels:

Friday, June 04, 2010

PROBLEMS OF MY 2001 JEEP GC WJ (99-04)
1. Rear Windshield Wiper Motor; 127 CAD

2. Rear window lock actuator; 

3. Power window motor (passenger side);

update: Power window motor (driver side); replaced $38.8. (August 17, 2011)
update 2: ebay part was not durable, ordered from a dealership for both sides (July 14, 2012  $280)

4. Seized front right caliper; 90 CAD

5. Broken CV boot; 90 CAD CV boot broken again ( at 08/2010 120 USD)

6. Lower tie rod end; 90 CAD


7. Fuel pump failure (hard start overnight); 680 CAD

8. Crank position sensor (about 200 CAD)

If P1756 code cannot go off with corrected fluid level, I might have (ALREADY replaced, note in 03/2011) to buy

8. Governor pressure sensor+soleniod (257 CAD + tax at dealership) and  AMSOIL ATF (100 CAD)

9. Water pump (640 USD)


10. All discs and pads (300 CAD)


11. Electric Fan relay (32 USD)


12. E-brake  (400 USD)

UPDATED ON MARCH 31, 2011.

E-brake handle ($93 from airpark dodge dealership, AZ, 2012)


13. Brake flush (47 USD)

14. Differential flush ($34)

15. Wiper arm ($76)

16. HAVC control panel ($151)

17. Hood support struts ($46)

18. wheel center caps ($50)

19. Tail lights assembly with sockets ($65+$35=$100)

(updated Jan 2014)

Total as of Jan. 2014 $4342.

Labels:

Thursday, June 03, 2010

P1756 Jeep Grand cherokee problem

Too bad my Jeep is sick again! P1756: Mid pressure malfunction....Governor sensor/solenoid problem.


See http://www.youtube.com/watch?v=TWXaoC3Qi7g


Today I checked the transmission fluid level.  It was far too low than normal. Even though I knew the measuring procedure, it is still very annoying and perplexing to read the dipsptick:
One side reading looked ok but the other side was too low.
        Another trouble was that I used Amsoil ATF to flush the tranny and already run  out of it. I had to spend $16 for a single quater in a small auto parts shop. After driving to and forth for almost a whole day, I finally add 1 quater of ATF.

code erased. let's wait and see if it could come again. If it is not the fluid level problem. i had to replace the governor pressure sensor/solenold which will cost more than 260 cad plus tax and extra ATF.

so far so good without replacing anything.

Labels:

Wednesday, May 05, 2010

Emission Test of my Jeep GC 2001

2007 ASM2525 E-Test    Limit (reading)
                  2500 RPM                      IDLE
HC ppm    150 (8)                            150 (6)
CO %        0.7(0.00)                         0.7 (0.00)
NO ppm    N/A                                 N/A
RPM         2334 (VALID)                727 (VALID)  
Dilution    14.60                                14.50


2010  ASM2525 E-Test    Limit (reading)


                  2525 RPM                      IDLE
HC ppm    52 (7)                            150 (4)
CO %        0.29(0.00)                     0.7 (0.00)
NO ppm    578(2)                           N/A
RPM         1373 (VALID)             738 (VALID)  
Dilution    14.40                             14.30


Labels:

Thursday, April 29, 2010

Check Engine light P0442/0455/0456


去年底换完油泵check engine灯就亮了。读码是 P0442/0455/0456属于EVAPORATIVE 系统泄漏。因为知道 vapor lines有裂缝, 用绝缘胶粘着,当是那里出问题了, 所以一直忙乎没管它。

昨天收到尾气检查通知,没法拖了。 只好网上查了查准备买件换掉vapour purge harness/vacuum defect motor/vapor lines. 大约100多吧。

今天都准备去买东西了, 好奇打开舱盖看看到底啥情况。 摸索摸索, 看看哪里有新的裂缝。 抬头一看。 NND! Intake manifold上面一根rubber hose脱落一边, 晃荡晃荡。 气死我了!

插上去以后, 最大的故障码P0442(大泄漏)没了。 还剩下两个表示小和中等泄漏的故障码还在: P0455/0456。再看油耗 18.3 奇高无比。该不是油箱漏吧。

有一次加油加到油箱跳, 回家下车汽油味巨浓。 爬到车底一看, 妈呀, 漏汽油呢。把手伸到油箱上面, 靠, 满手汽油。 心里有底了, 上次换油泵没搞好。

跑到修车行, 卸下油箱, 倒扣, 妈的, 汽油滴滴嗒嗒从油泵与油箱缝隙漏。 重新安装, 确保倒扣不漏。 开回家200公里没有灯亮。

没过几天, 嘿又亮了。 还剩一个: P0456(最小的那个泄漏)。纳闷了: 还有哪里呢? 再去加油, 还真漏呢, 这回是注油口。原来上次卸油箱把锈蚀厉害的注油口的金属管断了一节, 套上去橡胶管的时候没有把锈除尽, 密封不严。

再认真清理一遍, 装上。好了。


Labels:

Monday, August 17, 2009

失败的DIY经历: Jeep打火困难的问题

99-01年的Jeep Grand Cherokee 有个打火困难的问题。 我01年的Jeep GC, 24万公里出现了这个毛病。刚开始把钥匙打到ON上面会有帮助。 但是慢慢的也不中了, 必须打两次才能着火, 后来发展到半箱油必须打三次。查了一下, 出现这种情况的原因通常有两个。 一个是crank position sensor坏了, 另一个是汽油泵泄漏, 不能维持油压。第一个情况在99年以前的Grand Cherokee非常常见, 维修相对便宜的多。

我资金紧张, 不敢上dealer那里修。想碰碰运气,就从dealer那里买来crank position sensor自己换。 没想到那个sensor躲在发动机与变速箱的钟形结合部位,上面是一片高度不足10厘米的弯曲空间,手伸不够, extension bar也不好使。半夜里躺在地上戴个头灯死活也整不下来。MM的,气死了。望着满天的星星那个长吁短叹阿, 为啥没银子买个新车。

没法子, 只好打电话给dealer问他们能不能换。 dealer倒是很爽快说一个小时人工即可(件已经从他们那里买了)。很高兴就跑过去让他们换。我眼瞅着一个秃头伙计整整倒腾了一个上午才搞下来。 取车的时候, 他们说, 其实你的打火困难不是sensor的问题。是油泵。再花2.3小时人工就能搞定。加完税太贵了。 我说再考虑吧。

凑活着开了一两个月吧。我决定要出门工作几个月, 把车让领导开。 打火困难的问题越来越严重了。 不行阿, 万一领导在路上熄火了那不急得只能抹眼泪。还是修了吧。打电话给多伦多的老孙, 老孙问问多伦多的dealer的汽油泵价格, 被告知,只能special order, 买了不能退。老孙心理打鼓了, 说你还是找dealer吧, 万一买了换了, 不是那毛病, 咱俩都不舒服。

于是打电话给dealer, 那伙计一听是01年的Jeep 4.0liter的发动机, 估计上次给倒腾坏了, 非要把精力损失补回来, 坚决的说, 4个小时的人工。他们的技术手册明明写的是2.3小时,TMD太黑了, 自己技术糙还怨我这个DIYER呢。 不行。 直接打电话给老孙: 你只管买件帮我换。风险我自己承担。

约好一个周五, 跑到老孙那里换, 老孙的几个伙计三下五除二就给换了。 因为打火困难的问题是停车至少超过10多分钟后才出现。当时着急去朋友家就没怎么试,直接开走了。

半夜里, 跟领导跑出来一起来试车, 打火的那一刻, 心里的阴霾随着机器轰鸣一扫而光。

后记: 老孙后来打电话问是不是好了。领导乐呵呵的说, 打一次就可以了。我说, 你这话有点歧义,似乎第二次才着,最好说,一打就着。

Labels:

Monday, June 22, 2009

Techenical Service Bulletin of Vehicles

www.nhtsa.org

Labels:

Sunday, May 31, 2009

2001 Jeep GC WJ Fuel pump and Fuel regulator


Fuel pump (Mopar part number 5018056AC)


Fuel filter/regulator (Mopar part number 52100283AG)

Labels:

Monday, May 25, 2009

2001 WJ Jeep Grand Cherokee CPS

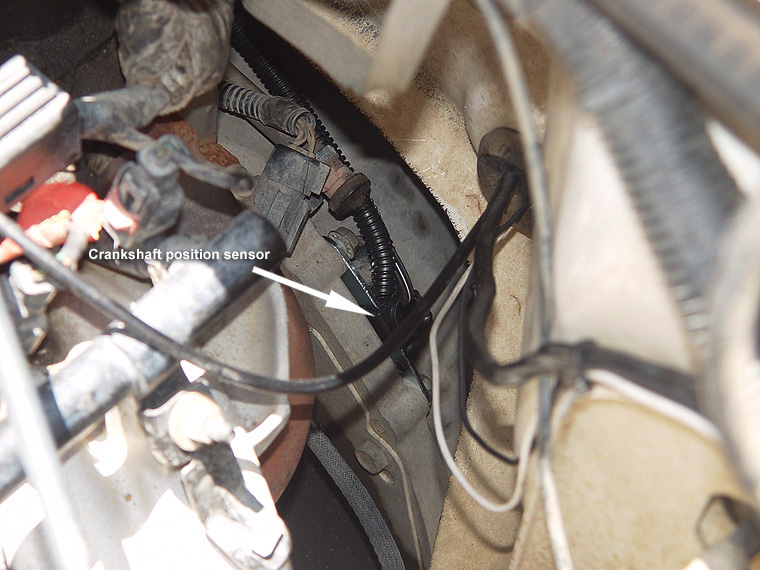
The location of the crankshaft position sensor is dependent on different models. For a 4.0 Liter I6 Engine WJ Jeep, it is located at the 11 o'clock of the bell housing under the driver's seat from the rear view. (See Figure 17)

For a V8 5.2 HO engine WJ Jeep, it locates above the starter which is much easier to access. (See Figure 18)

Labels:

Sunday, May 24, 2009

Jeep TJ Wrangler Crankshaft Position Sensor Replacement

This write-up is cited from http://www.4x4xplor.com/cps.htm for personal use only.
Figure 1

Figure 2

Figure 3

Figure 4

Figure 5


There are several reason why you would need to replace your Jeep TJ Wrangler's Crankshaft Position Sensor (or CPS for short) with the most obvious one being that your 'check engine' light has illuminated and a quick check with an OBDII reader indicates you have thrown one of the following MIL codes.

Crankshaft position sensor at about 11 o'clock on the bell housing. Easiest way to verify is to crank the enine and watch the tachometer, if it doesn't bounce while cranking, it's the CPS.

P0219 - CPS Overspeed Signal

P0320 - No Crank Reference Signal at PCM

P0387 - CPS Voltage Supply too Low

P0388 - CPS Voltage Supply too High


For me, my Jeep wasn't throwing any codes and so I wasn't completely sure that this was something I needed to replace. What lead me to think that it may need to go was the fact that I now have over 120,000 miles on the odometer, I have already replaced my O2 sensors and still had various engine issues including a rough idle under specific conditions. Specifically, my engine would run very rough on cold mornings or after driving it a long time with the AC on, turning off the engine briefly and then starting it back up again. I had also experienced times when climbing up long highway hills the engine would run quite rough... almost as if it were misfiring. Now, I should tell you that things are better since installing a new CPS but my engine is still running far from perfect.Anyway, this write-up should help you out if replacing your Crankshaft Position Sensor is something that you need to do.Instructions

Your Jeep TJ Wrangler's CPS is located on top of your transmission's bell housing as can be seen in this photo which was taken standing on the driver side of my Jeep and looking down into the engine compartment.

1. The bolt or bolts (different years have the CPS secured to the bell housing in various configurations) can be access either from the engine compartment or from underneath your Jeep as shown in this photo. Using a 7/16" wrench or socket with 3" drive extension, remove the bolts securing the CPS in place and pull it out of the bell housing.

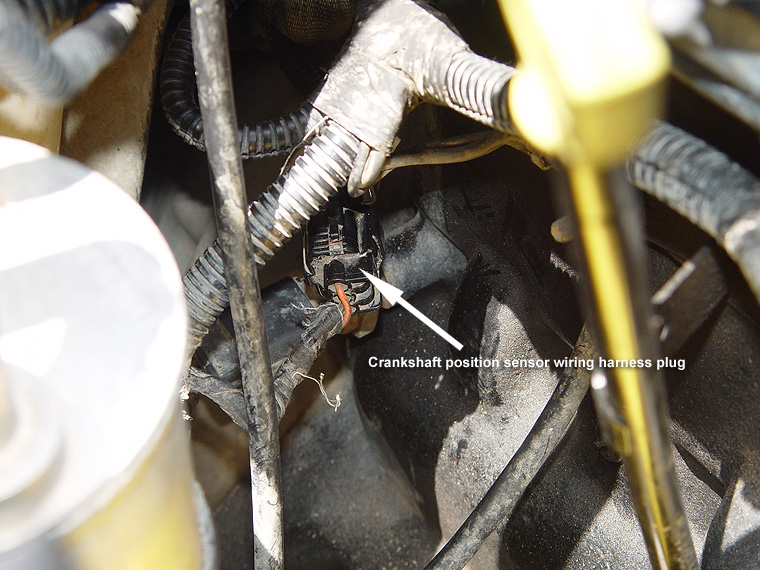
2. The wiring harness for your Jeep's CPS wraps around the engine block and it's plug can be found on the passenger side it, behind the oil filter and next to the fire wall as shown it this photo.

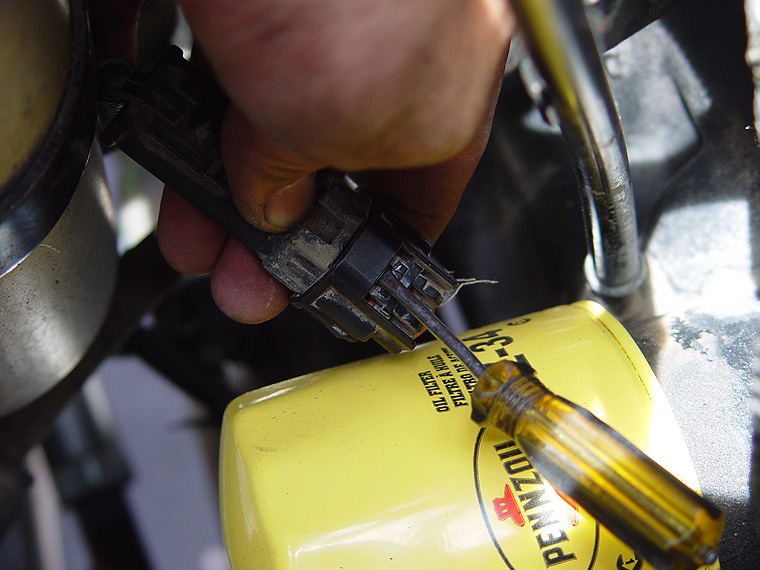
3. The CPS wiring harness plug may be a bit difficult to unplug and if needed, a small flat head screwdriver can help. Just be careful not to use too much force as you will break the plastic plug. Once unplugged, remove the CPS out of your engine compartment.

4. Insert the new CPS into your Jeep's bell housing and secure it in place to 60in. lbs. of torque using the factory bolt(s) and a 7/16" wrench. Then, pass the wiring harness around the back of the engine block so that the plug is on the passenger side of your Jeep.

5. Plug in your new CPS wiring harness making sure that it clicks into place.
That's it, you're done! The entire job should take minutes to do. Please email me with any questions you might have.

Labels:

Friday, April 17, 2009

发动机异响诊断分析-3

2.3活塞销响

2.3.1现象

发动机在怠速、低速和从怠速向低速抖动油门时,可听到明显而又清脆的“嗒、嗒、嗒”好象两 个钢球相碰的的声音。响声严重时随转速的升高响声增大,但机油压力不降低。单缸断火时响声明显 减弱或消失,复火瞬间,响声又出现或连续出现两个响声。

2.3.2原因

(1)活塞销与连杆小头衬套配合松旷;

(2)活塞销与活塞上的销孔配合松旷。

2.3.3诊断方法

(1)抖动节气门试验。发动机怠速运转,然后由怠速向低速急抖油门,响声能随转速的变化而变 化。每抖一次节气门,如能听到清脆而连贯的”嗒、嗒、嗒”的响声,则有可能是活塞销响。

(2) 断火试验。将发动机稳定在响声较强的转速上,松开高压油管接头进行断火试验。当某缸断火后响声明显减弱或消失,在复火的瞬间又能立即出现或连续出现两个响 声,则可断定为此缸活塞销响。如果响声严重,并且转速越高,响声越大,此时在响声较大的转速下进行断火试验,往往响声不消失且变得杂乱,这一般是由于配合 间隙增大到了很大程度的缘故。

以上两种方法如能配合使用,响声会被听得更清楚。

(3)听诊。在微抖油门使发动机转速不断变化的情况下,用听诊器或简易听诊杆触在发响汽缸的 上部或气缸盖上,可听到清脆的响声。打开加机油口,也能清楚地听到这一响声。

2.4活塞敲缸响

2.4.1现象

发动机在怠速或低速运转时,在汽缸的上部发出清晰而明显的”嗒、嗒、嗒”的响声,发动机中 速以上运转时,这种异响便会减弱或消失。该响声冷车时明显,热车时减弱或消失;单缸断火,响声 减弱或消失;响声严重时,负荷愈大响声也愈大,但机油压力不降低。

2.4.2原因

(1)活塞与气缸壁配合间障太小;

(2)活塞与气缸壁间润滑条件太差。

2.4.3诊断方法

(1) 在不同水温下诊断。敲缸响的特点是冷车时明显,热车时减弱或消失,因此,应先在冷车时诊。若冷车时有敲击声,热车响声消失,说明是活塞敲击响,且故障尚 轻,车辆可继续运行;若发动机热起后响声虽有减弱,但仍较明显,特别是大负荷低转速时听得非常清楚,说明响声严重,应停驶 检修。

(2)断火试验。把发动机置于敲击声最明显的转速下运转,松开高压油管接头进行断火试验。如 某缸断火后响声减弱或消失,则为该缸敲缸响。

(3) 加机油确诊。为了进一步确诊是否是活塞敲缸响,可将发动机熄火,卸下有响声汽缸的喷油器,往汽缸内倒少许机油,并用手摇把或起动机转动曲轴数圈,使机油布 满在汽缸壁与活塞之间。然后装上喷油器,启动发动机,若响声短时间内减弱或消失,过一会儿又重新出现,则可确诊为是活塞 敲缸响。

(4) 听诊。将听诊器或简易听诊杆触在机体上部的两侧进行听诊。一般在发响汽缸的上部往往响声较弱并稍有振动,再结合断火试验,即可确定出发响的汽缸来。有时听 诊还可诊断出发响的原因来,如听到“嗒、嗒、嗒”好象用小锤敲水泥地的声音时,一般是汽缸与活塞间隙太大造成的;如听到“刚、刚、刚”好象用小锤敲钢管的 声音时,则有可能是汽缸壁润滑不良造成的。

2.5气门响

2.5.1现象

发动机怠速运转时发出连续不断的、有节奏的“嗒、嗒、嗒”(在气门脚处)或“啪、啪、啪”(在气 门座处)的敲击声,转速增高时响声亦随之增高,温度变化和单缸断火时响声不减弱。若有数只气门响,则声音显得杂乱。气门脚响和气门落座响统称 为气门响。

2.5.2原因

(1)气门脚响

①气门脚间隙太大;

②气门脚间隙调整螺钉松动或该间隙处两接触面不平;

③配气凸轮外形加工不准或磨损过甚,造成缓冲段效能下降,加重了挺杆对气门脚的冲击;

④气门脚处润滑不良。

(2)气门落座响

①气门杆与其导管配合间隙太大;

②气门头部与其座圈接触不良;

③气门座圈松动;

④气门脚间隙太大。

2.5.3诊断方法

气门脚响和气门落座响很类似,诊断方法也差不多,由于它们不上缸,因而采用单缸断火或单缸 断油的方法无效。

(1)听诊。听诊气门响时不打开加机油口盖就能在发动机周围听得清清楚楚。当发动机怠速运转 时,听到如现象中所述的有节奏的响声,可稍加大油门。如果此时响声较明显,逐渐加油时响声又随 转速的提高节奏加快,可初步断定为气门脚响或气门落座响。

柴油机由于受着火敲击声的影响,其气门响不易听诊。听诊时可采用提高转速后迅速收回供油拉 杆的方法,趁发动机降速时,避开着火敲击声的干扰,仔细倾听。

(2) 检查气门间隙。打开气门室侧盖或气门室顶盖,用厚薄规检查用手晃试气门脚间隙,间隙最大的往往是最响的气门。运转中的发动机,当用厚薄规插入气门脚间隙处 致使响声减弱或消失时,即可确定是该气门响,且由间隙太大造成。若需进一步确诊是气门脚响还是气门落座响,可在气门脚间隙处滴入少许机油。如瞬间响声减弱 或消失,说明是气门脚响;如响声无变化,说明是气门落座响。气门落座响如系座圈松动造成,其响声不如气门脚响坚实,且带有破碎声。

2.6汽缸的漏气异响


2.6.1现象

发动机运转时可从加机油口处听到曲轴箱内发出”嘣、嘣、嘣”的漏气声,负荷、转速愈高时响 声愈大。当收回油门或单缸断火时,响声减弱或消失。此外,随着响声的出现,可看到加机油口处脉 动地向外冒烟,脉动次数与发响次数相同。

2.6.2原因

(1)活塞环与汽缸壁漏光度太大;

(2)活塞环开口间隙太大或各环开口重合;

(3)活塞环弹力太弱或因其侧隙、背隙太小而造成背压力建立不起来;

(4)活塞环卡死在环槽内;

(5)汽缸壁拉伤,出现沟槽。

2.6.3诊断方法

(1)断火试验。打开加机油口盖,提高发动机转速至响声最明显、冒烟最大处稳住。若某缸断火后 响声减弱或消失,且加机油口处的冒烟量明显减少,说明漏气异响是该缸发出。

(2) 加机油法。为了进一步确诊是否是活塞敲缸响,可将发动机熄火,卸下有响声汽缸的喷油器,往汽缸内倒少许机油,并用手摇把或起动机转动曲轴数圈,使机油布满 在汽缸壁与活塞之间。然后装上喷油器,启动发动机,若响声短时间内减弱或消失,过一会儿又重新出现,则可确诊为是活塞敲缸 响。

2.7正时齿轮响

2.7.1现象

有的有节奏,有的无节奏。在有节奏的响声中,有的属于间响,有的属于连响。转速越高,响 声往往越大。使用单缸断火,响声不减弱。

2.7.2原因

(1)齿轮啮合间隙过大或过小;

(2)曲轴主轴承孔与凸轮轴轴承孔中心距在使用或保修中发生变化,变大或变小;

(3)齿轮的齿形不符合要求或齿面磨损过甚;

(4)齿轮转动一周,其啮合间隙松紧不一或发生根切;

(5)齿轮齿面碰伤、脱层或轮齿断裂;

(6)齿轮在曲轴或凸轮轴上松动或脱出;

(7)曲轴或凸轮轴轴向间隙过大;

(8)重新装配一对正时齿轮时,改变了原来的啮合位置;

(9)未成对更换齿轮。

2.7.3诊断方法

诊断的方法有两种:一种是变换油门开度法,另一种是听诊法。在配合使用上述两种方法的同 时,要结合以下情况分别进行判断。

(1)诊断中若发现响声是无节奏的,且在发动机怠速运转时发出”嘎啦、嘎啦”的响声,中速时 响的更为明显,高速时响声变得杂乱并带有破碎声,响声严重时正时齿轮室盖处有振动,这有可能 是齿轮啮合间隙太大造成的。

(2)如果出现一种连续不断的”嗷——”的响声,发动机转速越高是响声越大, 并且经证实该机更换过正时齿轮,则有可能是齿轮啮合过紧的缘 故。

(3)如果出现有节奏的”哽、哽、哽”的响声,发动机转速越高时响声越大,则可能是齿轮啮合间 隙不均造成。若响声为连响,则故障出在曲轴正时齿轮上;若响声为间响,则故障出在凸轮轴正时齿 轮上。

(4)若响声是有节奏的,发动机怠速运转时能听到”嗒啦、嗒啦”的声音,中速以上时又变为紧 凑的”嗒、嗒、嗒”的响声,这往往是金属齿轮齿面碰伤以后出现的响声,如果故障在曲轴正时齿轮 上为连响,在凸轮轴正时齿轮上为间响。

(5)若在发动机怠速运转时听到”咯啦、咯啦”的撞击声,加大油门开度时,变为较杂乱的”哇啦 啦”的声音,甚至还带点“咯棱、咯棱”的撞击声,正时齿轮室盖处又伴随有振动,通常,这是一对金 属正时齿轮发生根切造成的。

Labels: